


Chris Walker
January 2, 2025
Lisa Tufano
January 10, 2025
Ellrick Garcia
February 13, 2025


Why pay more at the dealership? At Greentec Auto, we offer affordable, accessible and reliable hybrid battery replacements at up to 50% less than dealership prices without compromising on quality. Get the best value with expert service, mobile installation, and a warranty you can trust.
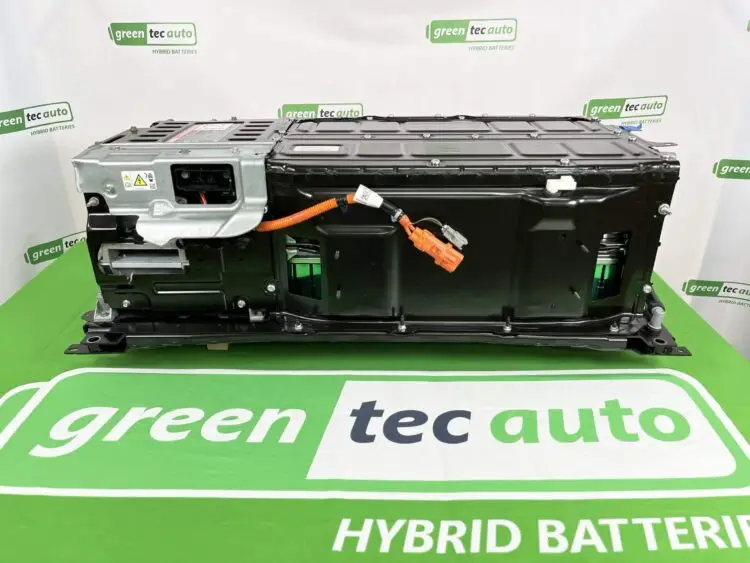
Hello everybody, the Battery Bros are back. I have Paul here with me. We are going to be taking apart a Mustang Mach-E 75.7 kilowatt hour. This differentiates a little bit from the one we did in the earlier video — there was a large hump in the back, but there are some internal differences. Paul and I are going to race to see who takes the most volts out, and we’ll get to talking about the battery pack after that.
Look at that. Got that nice lithium battery smell. So, very, very similar build as the long range version we saw earlier. Similar sized modules. Obviously again, there’s no hump, and there is going to be a configuration change in the modules themselves — they are going to be one cell fewer in parallel, and we’ll figure out how many there are going to be in series per module. We’ll give you guys that information. Right here on the top it does say 37 volts on the larger modules and 30 volts on the smaller. If I remember correctly from the other one, it was 30 volts on the larger modules and 27 volts on the smaller. So, a little bit of differentiation there.
Stuff up front looks about the same. There is a connector here that is not cut out, but there are bolts for it. I think that might be like an additional motor, maybe performance-wise — an additional connector that they never put in. If it’s an additional motor or something, I don’t know, but some option that this pack just doesn’t have, and then maybe it doesn’t have enough power to handle it. You know, basically the performance isn’t there, so they just don’t give you that option of motor. So it looks like it could physically fit in one way between the long range and the standard. Whether it’s actually compatible, we don’t know yet. That’s something that, once we have a vehicle, we would be willing to try, and then we’ll see if we can work around getting that connector added or if it’ll work without it. You know, it’s possible that the long range will fit into here and you block that connector, but if you try to take this and put it into the performance or the long range version, it might not accept it.
There’s a spot for a fuse as well. So it could be something — or like a dual motor all-wheel drive.
Yeah, that’s what I think that connector might be — an additional motor. Just because the Tesla Model 3 is the same thing.
Same thing there. Well, a lot of similarities. So again, we’re going to take out the different blocks. It looks like there’s going to be three different ones as well, just like the last one. And again, two that are going to be opposite of each other or mirrored of each other, and then a third smaller one. So we’re going to go ahead and pull one of those three out, we’ll do the same comparison, and then we’ll talk a little bit about repurposability, rebuildability, and just things that we like or don’t like. So we’ll start by pulling the BMS apart and then we’ll get into the details of that.
Well, let’s go ahead and take these three packs out again. Remember that tool? Yeah, the E — what was it, E12? E10 or something? And then we need an 8 and a 10. Let me see — I’m going to see if I can identify the module types.
All right, Paul. We got everything disconnected. We’re getting ready to pull the batteries out. We had a hard time doing it last time and you wanted to say a couple of things about that.
Yeah, so there’s a thermal gasket sealant in the base between the battery and the thermal cooling pad, and it’s basically stuck to it. We are going to make a special plate — we do have some threads on these modules all the way around. So when we do start rebuilding these, we’ll make something with our crane or the hoist and we’ll make it easier on our guys, and it’ll be a lot safer to pull these straight out. But for now, we’ll just struggle.
All right. Here you go. This is the cooling plate we talked about. It does have coolant running through it — you can see the connections here. It runs all the way underneath the pack. It’s really thin, but it gets the job done. It just circulates, and there’s an expansion tank underneath the hood just like a regular car radiator reservoir.
Right. So that’ll circulate and keep all the modules cool. Or warm — depends on where you live and what it is outside.
You broke it. You broke it. This is a different color from the other one though — the other one was like pink, right?
Pinkish red. Yeah, so they changed something. It was a lot stronger. Yeah, no joke.
So we’re probably going to take the third one out. Definitely not taking the third one out — we’ll have to repressurize those and check if they’re good or bad. And more than likely this is so new it’ll go for modules anyway. But the good news is the third one that we’re going to pull out is again the same as the one we just took out, except it is a mirrored version. You can’t see it because of the bars, but mirrored or reversed like they said. So we’ll go with the two we have. We’re going to go ahead and get some size and weight measurements on it.
Oh, it looks like it’s a 3P10S and 3P8S. They were different yesterday — they were 4P7S and 4P8S. Now we have 8 and 10. Bit different.
Can’t mix these with the ones from yesterday, because the other ones were the long range — or they call it extended range. Ford calls it extended range. So yeah, this is the standard. And then I think — what was the motor indicator? They had the option to upgrade them for the second motor, dual motor.
They have them, but Jaxx had it written down. Jaxx — he’s gone. All right, we’ll get some sizes, we’ll get some weights, and we’ll look at them there.
Now that we’ve got the modules out with a little bit of force, we can dive in a little bit. These are three in parallel, compared to the extended range which was four, right?
Four in parallel, yeah. And then sizing is pretty similar. 3P10S is a little heavier and longer — it’s sitting at 20 inches long, 14 and a half inches wide, and 5 inches tall. The weight of this one is 82 pounds and the smaller one is 66 and a half.
Yeah, okay. So, interesting thing is obviously there’s an odd number of cells. Yesterday we didn’t really point it out when we did the other video, but if you look carefully, you have two cells welded together there and only one on this one. Whereas yesterday there were two on each. So, didn’t really think about it — we would have shown you that on the other packs, and actually kind of regret putting them back because it would have been nice to have a side-by-side. So maybe we’ll get that later. But ultimately, yeah, these break down a little bit differently. There is still an 8S module, but it is what it is.
This is three-quarters of the capacity — there are only three cells in parallel. So technically it’s three-quarters of the capacity. But they’re able to get 8S and 10S to fit into the same space as they were only able to get 7S and 8S on the other pack. I think I’m saying too many S’s. It’s fine. But yeah, this one I think is actually a little bit longer than the one from yesterday, from the extended range.
We’ll have to put the measurements out for them. Yeah, so we’ll show you guys the measurements at the end — you guys can pause and take a screenshot.
Did you mention the lettering? No. But before, since you’re talking about size, what do you think about repurposing, second life? What can somebody use these modules for?
Okay, so 10S — this is actually a really good 36V module. 36V isn’t very popular. However, two of these makes a great 72V pack, and 72V is very popular. So two of these fit into a lot of applications — they’re actually a very nice fit in terms of the voltage range. And then you’ve got 8S here, kind of the same thing as yesterday. Two of those is a higher voltage 48V pack. Not every inverter can handle that 16S, but some of the better ones and some of the newer ones actually can. If you’re upgrading from lead acid, you might not be able to use the full voltage range of this, but if you’re buying a new one, more than likely you will be able to. But we have actually golf cart people that make the crazy fast ones that race them.
Golf cart people. I don’t know how else to say it — they’ll literally race their golf carts, pop wheelies. Exactly. And they’re putting 72V batteries and sometimes even higher. I mean, with these configurations you can go up to 120V or whatever. You can mix and match these, but you can’t mix and match these with the ones from the extended pack because of that one additional cell — you can have a capacity mismatch, and then one half of your pack is going to discharge way faster than the other.
What about cooling in the golf carts? You know, that’s actually a very good question. Well, these things are designed to handle hundreds of amps, right? And they are designed to be cooled when they handle that kind of current. I think it really depends on the application. A lot of the times, most people will put these in not-so-crazy applications where it’s usually energy storage, stationary, and they don’t have to draw a lot of current out of it, so they’re not really going to warm up. But if you are going to race a golf cart and pop wheelies, you’re going to be drawing a lot of current.
You do have a lot of airflow though. You have a lot of airflow, and maybe a heat sink on these fins could do it. Basically, try it and see if your temperature goes up. You need to have a BMS on here — you have the temperature sensors. Those people are just going to play it by ear and see if they need it or not based on what they do.
So, standard range packs — we can talk about the part numbers. You have D. The extended range we talked about yesterday has A, B, and C. Here we have D, F, and E we could not get out. E we didn’t try. Yeah, we quit while we were ahead. So it’s just a funny continuation. So A, B, and C you can mix; D, E, and F you can mix; but you can’t mix those first three with these last three. So just make sure. And then the letter we’re looking at is actually the second from last in the bold right here. So this would be the F of that module. So if you’re ever looking online or looking to buy them, that would be the indicator of which version module you’re looking at. And obviously the voltage and kilowatts are all on there too — that’s all pretty straightforward.
Somebody asked us a good question about repairing the modules, because we talked about being able to repair the pack by swapping a module, but can we repair the module by swapping a cell? And technically, yes, it is possible. However, it requires a lot of special equipment.
They are pouch cells, and they’re all laser welded. We do have a laser welder. However, it takes a lot of work to try to figure out how to replicate those original welds as best as possible. And when you’re reusing already pre-welded bus bars, that’s essentially what we would try to do. It’s not the best result. So it depends on the failure case, and it’s still too early to say if it’s worth it, because in a lot of the older cars that are aging out now, we’re seeing the whole module deteriorating. You know, maybe there’s one cell that’s in the worst condition, but the rest are usually not far behind to where there’s really no sense to fix the one cell. But technically it’s possible — whether it’s needed or not, we don’t know. Maybe we will, maybe we won’t. It’s too early to tell.
So, like we talked about in our Tesla pack video, if one cell in a module goes bad, you can still drive. And you were saying earlier that on this pack, if a pouch is bad, the whole battery is bad.
Yeah. So if a Tesla cell fails, it’ll burn up that little fuse and cut it out of the pack. Unless it’s a resistive cell or something, then it’ll just draw the pack down, but you have time to repair that. But essentially, a critical fault of the cell — meaning if the cell shorts out — it’ll burn up that fuse on the Teslas. Whereas, because you have multiple of those in parallel and they’re all individually fused, the battery can continue on from that. There’ll be a capacity imbalance, but it’ll survive. Percentage-wise, it didn’t lose a lot of its pack. With these, since we only have three in parallel or four in parallel, there’s nothing in here that stops one cell from dragging the rest with it. So if there’s a short failure in one cell and it starts to discharge, it’s going to discharge the other ones in parallel with it, or they’re going to discharge into that one. And that’s going to cause your entire vehicle to stop. So you’re not going to be able to continue driving with just one bad cell in the battery — it’s going to tell you you’re pulling over. You’re stopping.
Thankfully, Ford has an 8-year, 100,000-mile warranty. Do you work for Ford? No. I’m not sure what else to say about the packs.
The measurements we gave earlier, we did not count the harness on the side — that’s about another inch, but it is a little bit relocatable. You have a little bit of length in there where maybe you cut it and route it a different way, but that length is a little bit different. So we got aluminum to aluminum on the width for you there. And I think that was about all we wanted to say with these.
Pretty much standard range gets like 225, 227 miles from what I’ve heard. Oh, and on this one — from the one from yesterday, remember the terminals were diagonal from each other? Yeah. But all the modules here, they’re all on the same side. That was another interesting thing — I mean, that’s just because they’re all an even amount of cells in series.
That was another thing we wanted to say. This is the early version of the standard range, right? So right now this is essentially the NMC. They modified their extended range version to fit this — that was the way they did it. It’s just Lego pieces put together differently. And the newer standard range battery they provided is the LFP version. That’s the battery we’re going to be doing next, and it’s actually a CATL pack. That’s when they went away with this whole pack completely and got a whole battery from CATL. But essentially it was — was it 70 kilowatts?
So this one’s 75. That one was lower — I think it was 72 or 70. We’ll tell you in the next video. But essentially it’s a little bit lower capacity, but it was a lot cheaper to make, and it took up a little more space because it’s not as energy dense. So that’s why it does have a small little hump here. And we’ll see — you guys will see that in the next video. And actually the modules in there are very, very different, so we’re excited to show you guys those. I looked online and I didn’t find any information about that yet, so I think we might be one of the first ones to show the internals on that one, which will be neat.
Thank you for watching this video. Follow us and subscribe for more. As always, if there’s a particular vehicle that we don’t have yet or there’s a new one out that you guys want to know about, let us know. I think we have — we have Audi e-tron, Porsche Cayman, we have a Porsche, we have a Rivian, we have a Polestar, ID.4, we have Fisker’s. Yeah, we can do a Fisker one too if you guys are interested in the Ocean facts. All right, thank you for watching and we’ll be back with more. Battery Bros out.
Hey guys. So today we’re talking about Ford Escape hybrid battery replacement. We’re going to be going over cost, cells, lifespan, all the information you need to know.
So if you’re watching this video right now, maybe your Ford Escape hybrid battery just went bad, and I’m sorry if that’s you. Or maybe you’re considering buying a Ford Escape and you’ve heard that these battery costs can be super expensive and you’re a bit hesitant to do so. But today we’re going to break that all down and give you all the information you need to know. So let’s just get right into it.
So Ford Escape made two different types of batteries. Okay? So one was from 2005 to 2009, and the second model was from 2010 to 2013. Okay? So this is what the battery pack looks like. They’re nickel metal hydride cells all along through the pack — well, actually modules — and there’s going to be 30 inside of the pack itself. You have the fan right here, which basically sucks in air and pushes it into the battery to keep it cool. And yeah, so this is actually what the cells look like inside of the battery, right? So this is a remanufactured cell. And we found that this wasn’t the best solution. Okay, so these batteries that Ford made weren’t able to hold the charge, and there were a few other things that they weren’t able to do very well. So we kind of came up with our own solution. We’ve been doing it for I think over a year now and we’ve had very, very little problems.
So what the big difference is — anytime you buy a remanufactured battery from Ford, right, whether it’s a 2005 to 2009 model or 2010 to 2013, you’re getting a cell that is over 10 years old, potentially 15 years old basically. So remanufactured batteries can still last a long time — for example, for a Prius they can last up to 8 to 10 years. But these cells aren’t very good, and if you’re buying any one of these remanufactured cells from anybody, they’re going to be very, very old.
So let’s get down to lifespan, right? So Ford Escape hybrid batteries tend to last anywhere from 8 to 10 years on average, depending on the climate and where you live. Like if you live somewhere hot like California, Arizona, Texas, or Florida, the batteries degrade and they die in heat. So that could be a big factor for your battery’s lifespan.
Okay, a couple other things you should know about the battery replacement itself — it’s actually very, very simple. So it’s kind of in the trunk of your Ford Escape, right? So if you pop open the trunk and you’re putting stuff in the trunk, right below there is where this battery lies for both of the models. So we have two different options — we have an 18-month warranty and then we also have a 36-month warranty.
It’s pretty simple. If your battery dies, you don’t have to pay a shop for a diagnostic — $150, $200, whatever the dealership charges. We have a free diagnostic service. We can come out to you — your home, office, shop, business, wherever it is, even a Walmart parking lot — we can diagnose the car and also get the installation done on-site, or you can come to one of our 34 locations across the United States.
And a couple other things you should know about the battery — if you look right here along the side of the battery, this is basically the case, and there’s a lid that goes over it. We don’t currently have the lid on top of it right now just because we thought it’d be kind of cool to have all the wires and stuff visible. But yeah, and if you guys have any questions about the Ford Escape hybrid battery — how many modules, how many cells — you can drop it in the comments.
We’re actually running a deal right now for a winter sale. So if you want to buy a Ford Escape hybrid battery or you’re considering just looking at the price, click the link in our bio at greentecauto.com and you’ll be able to see the battery, the price, the warranty, all the information you need to know. And yeah, let’s get you back on the road with confidence.
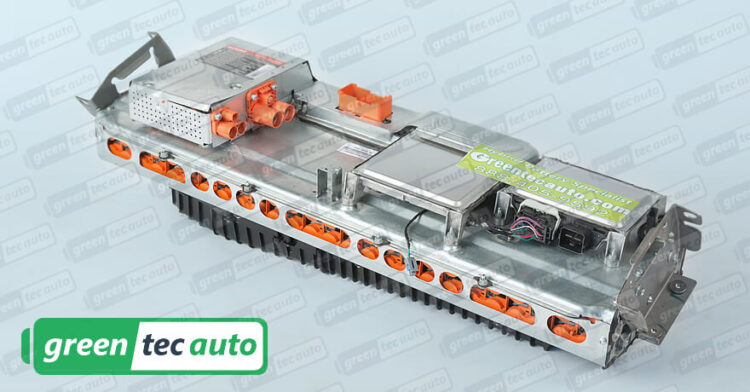
Hello, my name is Levi Thomas with Greentec Auto. Today we just got in one of the brand new 2024 Ford Lightning battery packs — that’s 143 kilowatt hours. So what do we like to do with everything that’s brand new and works perfectly fine? Open it up, tear it apart, and see what’s inside.
Before I start opening this up and tearing it down, I just wanted to show you the extent that Ford went to on this new 2024 Lightning battery to make service as easy as possible. This entire battery is one large cast aluminum tub coming all the way up from the bottom up to the side in one piece. It has one horizontal plane where the lid bolts on to the bottom, all the way around the outer perimeter. There’s one groove on the underside of the lid with a gasket in it going all the way around in one piece. Every few inches there’s an 8mm bolt holding the lid onto the bottom. Once you undo all of them, this plastic lid pops off, and that gasket can be replaced and this lid can be reused over and over and over. Following that same design, the bolts are coming from above — all the modules and the components inside the battery also have their connectors coming from above, bolting down into the cast aluminum tub, so they can all be easily removed and everything lifted out to get to the underside of everything.
So now that we got it all opened up, right off the bat there are a few main design features that jumped right out at me. First off, in the new 2024 there’s no sealant that goes around the outer edge or any sort of glue — just the one gasket that’s really big and has several rubber grooves inside of it, so it securely fits into the lid and stays in the lid when you take it off. So it could be taken off by one person. In fact, I pulled it right off and it came off super clean — again, because there’s no glue. I lifted it right off and just set it to the side.
So this little clip on the coolant hose is a huge design upgrade. Tesla Model S, Model 3, Ford Focus, and many others have the coolant plugs on these outer corners. However, the Ford Focus’s coolant plug is molded to the hose that goes all the way to the far side of the battery, so when that breaks off you have to take the whole battery apart and replace a large expensive component. Whereas in the 2024 Ford Lightning, you just unclip it — it’s two 10mm bolts and it releases the small plastic plug, and it’s easy to service and replace.
Another really good design feature that Ford did on this battery: while this is all one large cast aluminum battery tub, the subframe is steel with 10 bolts going along the underside, and then a bunch of different holes all the way around that are reinforced, giving you tons of options to be able to connect to it and lift and move the battery around to work on it.
So now for some of the cons. The most disappointing thing that’s going to make repairs difficult and limit reusability is this pesky 8S module right in the front. The rest are 11S. So if all the modules were the same, if one went bad you could just replace it with another one — it wouldn’t matter where it came from in the pack. With one being different, that’s going to be really difficult for consumers or even small shops, because most of them are going to want to buy two batteries and then just combine the modules that are good to make one good pack. Luckily here at Greentec, we’re at a scale where we can have so many batteries that we will have all of them on the shelf to be able to rebuild them. But for the average consumer, small shops, or mechanics, that’s kind of a big problem.
So one other thing that could make repairs and reusability difficult — in addition to this one module being smaller — is that these eight modules right here have a different number of wires going into each plug. Most of them have two wires on the right side of the plug, which we’re assuming is a thermistor or a temperature sensor. A couple of them also have four wires on the right side, separate from all the wires on the left. However, one module has no wires on the right and the same amount of wires on the left, so it looks like there are no temperature sensors in this module. However, we’re really hopeful that they actually manufactured these eight modules the same way with the same amount of thermistors, and they might just not have wired up wires to each module. So we’re going to go ahead and get out a voltmeter, change it to ohms, and check the plugs to see if any of them are most likely 10,000 ohms — and see if there is a temperature sensor inside of this module.
So let’s do that now. We’re going to go ahead and put this voltmeter on ohms, and I’ve got it hooked up to my phone here to make it easier to read. This is the module that doesn’t have any wires at all on the right side, so it doesn’t look like it has any connection to temperature sensors or thermistors. So I’m just going to go into the top two upper right corner just like this one has, and it does read 39 kilohms. And now let’s go to the bottom two right, and it reads 39.6. So it’s not a 10,000-ohm resistor. So let’s go ahead and check a different one that we know.
Now if I go and probe this module here, right into the wires — even if it is a thermistor, it’s going to be a different reading because it’s hooked up to the BMS, so it’s reading 2,459. That doesn’t really tell me anything. We need to unplug it. So I’m going to go ahead and pull the red clip here, which then allows you to depress the top plug and remove that.
Now I don’t want to use the sharp connector anymore, so now that I’ve got one of them covered all the way except for the tip — connection’s good — and my voltmeter is ready. I’ve got this unplugged and I know where those two wires were on the top right, so I’m going to go ahead and make contact with this one right on one of the pins — and 39.3. So it does look like that one that has no wires on the right side does have a thermistor inside of the battery module, which is great news. That means that these modules — all eight of the larger ones — are probably manufactured the same on the inside, and since the plug on them is the same, you could probably move them around and then the harness just has a different number of thermistor wires going to it that go to the BMS. So that’s great news.
I’m going to go ahead and check the bottom of this one which doesn’t have wires going to it, just to double check and see if it has two thermistors in it. 39.4 — yep. So even though this has two wires here, it does have two thermistors, top and bottom there.
So that’s great news. So another thing that I found to be an odd design is the BMS. This battery doesn’t have a BMS in each module — there’s just this one centralized BMS, and then it has 10 plugs going across it. So you would think with nine modules it might be one battery per plug, but that’s not how it is. There are about five plugs right here which have a lot of smaller wires, but not quite as many as are coming out of all the 10 modules. Some of them are mixed with a little bit larger gauge wires as well as smaller wires. Some have heavier ones and one has three wires coming out of it, but it’s not like the math adds up where two modules might go into one plug. It actually ends up where some of these modules have to be split between a couple of plugs, which is pretty odd, and it would be pretty difficult to trace a wiring problem down. And I’m not about to go into reverse engineering this in this video.
So the next thing I want to do is get into these two boxes here, which have the contactors and the fuses, because I’d like to see why these two high voltage plugs are joined together by bus bars — both on the positive and negative side — and then go into the boxes here. I’d also like to see this plug that broke in shipping, kind of like the coolant port, but I’d like to see on the back of it if it’s a plug or if it’s a wire, because if it’s a plug that would be a lot easier to replace that part. If it’s a wire, I’d like to see how that can be replaced and show you guys.
But before we get into this stuff, I need to disconnect the negative-most bus bar and the positive-most bus bar so that there’s no high voltage back here at all.
The bus bar is still around the stud so it’s not flapping around yet or anything. That stud’s sticking up at least an inch, so it’s probably good to do that side first, because on this side it’s a bolt. So if you did this side first and then you’re working on that, this could flap around and hit something.
What’s that? There’s nothing holding that on. This whole bus bar is just sitting on these little plastic tabs that bend, and then little plastic tabs on the top that squeeze on the lid so that it’s just floating in between the battery and the lid. Pretty clever, pretty simple. Now I wonder about longevity — how long this lasts. So if you gave this, you know, 300,000 miles — this clip already looks like it’s bent in a little bit more than this one right here. So yeah, this bounces on the battery and this bounces on the lid so that they can float in between.
This was the positive — probably for the DC fast charger. Here’s the positive. It comes down to these two, which are not connected to the DC fast charger — that should be a separate contactor. Yeah. All right, well I’m happy there’s no voltage, so let’s go ahead and open up those boxes.
So to take this white cover off, it looks like the plastic goes under the bus bar connections in one piece, just like this one. We already have this bus bar off — let’s see how this white plastic came down and around, all the way molded into one piece. Same thing happens under this bus bar here. So we’ve got to take off all these bus bars.
When you take this nut off, this black plastic will hinge up so that it can lift out. All right, that’s not too bad. Looks like a 12mm again. Yeah, so 12mm I think. So I’m going to start on one side and systematically go through.
Okay, that one’s off. There are the two there. I bet there’s one on the end — yep, just like the other side. I wonder if this can push over — no, I cannot. Oh wow, that’s solid cast aluminum. So this cast aluminum base has like an inch slab going through the middle, and it is right there against where that clip has to come out.
I need like a hook. All right, while I get this out I’m going to go ahead and get these ones. I think I can get this one. All right, might have to invent something here. I cannot foresee anything plastic that shape being strong enough. However, I don’t want much metal back here even though there’s no voltage on this back part. So I think I can get it with this. That’s a tricky design — you can’t pull the clip off because it hits the center beam. But man, is it close. Let me see if I can just get this next one. Yeah, there it goes. That one came off. Maybe let’s try switching this and copying what I did on the other side — use the tweezers to hook around the side, which is 90% of it, and then use the flathead just to really kind of pry this whole thing this way so that it can just get out. Yeah, there it goes.
Okay, so it is doable. For a second there I thought I might have to unbolt the whole thing off of there, but man that would be a lot of work because there are also clips all the way around holding this to the bottom which I didn’t want to have to mess with — I just wanted to look in here.
I already got this one. That one was super easy. I’m going to tackle this one the same way as I did that one. I’d like to switch back to plastic if I can. Let me undo some of these plugs here. They just come right out — wow, those are easy. You just barely barely depress that. That one’s got some sort of red retaining clip. Looks like I need to get a flat head in there. Yeah there we go. Well, now that goes down and that comes out. Okay, so that red clip completely lifts all the way out and then you can push this all the way down really easy and then it just pops right out.
This positive comes in here, this goes down right off of it — I’m assuming to probably a pre-charge resistor, because there’s a relay right here. This is a big contactor that comes over to this. So this positive comes right to this bolt, and then you have four layers of copper on top of each other here going over to this contactor. And then off of that bolt is a smaller wire that goes down, and there’s a plug, but then there’s also a relay right here and I bet that is a relay for a pre-charge resistor to jump across here. Yeah, because then it comes out to here, and then we have one bolt where that bus bar goes out over here, and then the other contactor which also has a plug for the pre-charge resistor — and that went to our DC fast charging. That is very simple and very compact. I like it.
Now the negative side here looks like there’s a little bit more going on. So this negative side came from the negative-most battery to this bolt right here, and then here is your amp meter — that’s a Hall sensor to detect how many amps are flowing in or out of your battery pack. So that comes over to this first contactor. And where is the current output out of that contactor? After that contactor, off of this plate — I don’t see it because this clicks as well. To get the negative current to this bolt which goes to these, and then this one went over to our DC fast charger.
Okay, so the next thing that I want to check is how easy is it to replace this broken plug right here. I believe this is the plug that does the air conditioning and the DC-DC converter, but it got a little crushed in shipping along with the coolant hose connection. But I cannot for the life of me see inside there. I’ve gone at it with two flashlights, my phone, and even took a photo — which we’ll insert right here — and you still can’t see how exactly it’s connected and if it disconnects from the outside. So I think the only way to go about this is to take this off, pull it out with the wire harness coming out, and then look at it from the outside.
So the first thing I want to do — and this is just peace of mind — I love these large silicone mats. I’ve got them on the table, but I’m just going to drop this across this entire module and then halfway all the way up into this contact box. That way when I’m working right here I’m not so worried about my elbows and stuff like that.
I think I can leave these larger bolts on. On the outside here, this is kind of a larger hex with a really small hex, and then this is a T20 it looks like. And then I’m going to pull out this handy little tool that we all own and never use, which is a little ratcheting quarter inch. Just because this plastic is already broken, I just want to make sure these get loose without taking the full impact gun to them first. Yeah, they do have lock washers on them. Yeah, they all broke loose.
All right, yes, there are some retaining pins — these are gray retaining pins on the inside here that are expanding out. If I’m trying to pull this — just disintegrated in my hands. However, that being said, I can still see where you would take that off, and then this slides out. There’s a little ring here where the gasket was down inside of it. That’s a pretty deep gasket with kind of a double wall on it — reminds me of the gasket from the lid, where it goes really deep down into the hard plastic and then still leaves quite a bit out for compression to make a really good seal. Two walls there — so that’s pretty nice.
So once that’s off, it doesn’t look like there’s anything keeping it from just going in. Yeah, there it is. Wow, that orange plastic is just falling off like crazy.
And as far as this plug right here — it’s still crushed in the plastic and the metal. So this is a part we need to replace. However, these wires come up into this harness and get wrapped as well — not fun to go messing with a wiring harness that ends up being that big. So we’d like to repair it at the plug.
I’m looking for anything that looks like it could release. Oh, I think I see it. All right, I’m going to bring it in closer and show you how I think we can get these wires out of that housing and then save it.
Okay, so really quickly I’m going to reenact this. So I put it back together a little bit — I didn’t bolt it back down because it broke apart — but how it came off was we unbolted it and then the plastic slides off the metal here, and this one broke. But you can actually see on the plastic here there’s a groove right here, and that slides down these side tracks right here and right here. So that just slides on, and then it stops it at the right spot and pushes back inside here, and there are these little tabs that hold it from going out.
Now as I said in the video a little bit ago, this is all one wire, so we don’t want to mess with this. And I see there are two tabs on this half and this half with these two wires. Looks like there are two little tabs here. So the question is, how do we depress them at the same time?
Yeah, I think this will work. So I like these ceramic tweezers because sometimes you can even use them to pull open and then hold on. That’ll hold one side while I’m probably going to use metal tweezers on this side, because I need to push and then pry — trying to get down in there and then lift that plastic out.
All right, let’s go ahead and get this other side. So these are replaceable, where you can replace the outside and the housing that sticks and protrudes to the outside, while maintaining the wires and the housing on the inside. Which is very good news.
We need to reuse this so I don’t want to go any further until I really figure it out. Little slot groove there — and there are your pins. So make sure you keep track of which one goes where. So yeah, you have to grab the actual pin and push it to one side, which you can see that little rectangular hole that releases it from the blue plastic. So once you get the retaining clips depressed and it pushed halfway out, you then push the tab over to release the clip that’s holding that rectangular hole in.
All righty, that’s not too bad — it’s a lot easier than I expected. And it appears that all of these are pretty close to being the same way.
Before we go any further here, I just wanted to see if there are any warm spots at all in here. And so far the only thing we’re seeing — these little bars are just reflection of the lights. So everything looks good. All the BMS wires look good. That means nothing got shorted out, nothing got crossed — everything looks good.
Those must be like alignment bolts. Yeah, I bet those are alignment bolts — they go on before so you slide it down. All right, definitely smaller.
The L is two pieces of like 3/16 aluminum, I think.
I’m going to start here at the one that doesn’t have a head. There is not stick yet so let’s fix that. I think all these Torx bits are holding this onto some sort of frame inside here, and they’re all on the top — just about everything that Ford has done so far — except for two on each end right here on the side, which could be a little tricky to get to.
Actually, you know what, I’ve got a tool for that. Okay, it’s a Torx — what do we say, T15? Yeah, P15. Not easy. All right, I’d say that’s the hardest part of the whole process so far. This little tool from AliExpress and/or Harbor Freight — it’s a lifesaver on this one.
Yeah, there’s no bolt in the way on this side. I think I’m going to start undoing the other side here so we have both sides off, and then I’m going to start undoing the side away from the plug simply for the reason that I can’t see anything protruding through on this side. So if I get over here and this is an issue, at least I can lift up and maybe look under and see what’s going on. Other than that, it probably doesn’t matter.
And then I’m going to make a note, once I get that first top one out, to make sure they’re the same size. We got them all out. And then another cool design — and I might be speaking a little too soon here — but it appears that these two black plastic zip ties, they actually made a cutout of the end cap to not hit those. So I think these will stay on this case when it lifts out. In fact, yeah, I’m just going to lift it up by them. Look at that, man — it does not get easier than that.
All right, so yeah, it’s a whole bunch of pouch cells which are really clean, and then they’ve got a black foam which looks like thermal foam, and it’s slightly sticky on each side — probably just enough to hold them in place. And then all these pouches are compressed foam down on it as well. There are two pouches between each piece of foam here, and this is an 11S module. So let’s see how many are in here.
Let’s find the halfway point. I can’t see under this black plastic, so the halfway point — we’re looking at like 30 and three-quarters, or 78 centimeters. So 78 centimeters halfway point is right here. So we have 2, 4, 6, 8, 10, 12, 14, 16, 18, 20, 22, 24, 26, 28 — that doesn’t add up. That’s like 56. That needs to be 55, which would be an odd number, but if they’re in groups of two that’s not making any sense.
Oh yep, this very last one is just a single one. So it’s just twos, twos, twos, twos, and then there’s just foam, then one, then the metal. So there are 55 pouches in the whole thing. So it’s five in parallel and then 11 in series to make this module right here.
And then off this plug here we’ve got all the battery sense cables. And I love how they did this here — look at how they started large and then got smaller, so that the resistance would be the same when it senses the voltage and does the balancing. That’s great. On some of the BMSs I do always cut them to be the same length, but if you absolutely can’t, some of the BMSs I use, you can actually go in and change the resistance of what it expects the wire to be. But they made the traces thicker. So let’s go ahead and count these: we’ve got 1, 2, 3, 4, 5, 6, 7, 8, 9, 10, 11, 12 — and then at the end of it there are 1, 2, 3, 4 little tiny ones. So those would be the thermistors, and they’re all going up this side.
Oh yeah, so there it is. So here we have the two little thermistor wires going right here, and then yeah you can see the little thermistor sticking right there. Oh, and here’s the other one. So there are the two thermistor wires, and then there’s some of that black foam again, and then the thermistor sitting right here on top. So that’s both the temperature sensors, and again this module only has two wires going to it. So I bet all of these modules, despite how many wires they have, have two thermistors. So that really helps when it comes to rebuilding these entire batteries.
And then with the thermistors up here on top of all of them — they’re on one end and then in the middle — but they seem to be alternating which direction the plug is, because this plug is right here and on this module the plug is over there. So this guy has the plug there, and the plug here, and the plug there. So the thermistors even alternate at which end of the battery they are. That’s pretty clever.
I bet there are thermistors on like the coolant input and output, kind of like how Tesla does it. But I haven’t seen that yet — I’m just guessing, since these ones are on top of pouches and not on any of the aluminum. And the aluminum underside here just has — this does not look like thermally conducting foam. It actually looks like sound dampening or something — it’s like open cell foam.
So one last thing I wanted to do here while we have this open: I’ve got a 365 nanometer ultraviolet flashlight here. So let’s go ahead and see what we’re working with. Wow, you can actually see right down in there — that’s the Loctite in each one of the bolt holes. That’s my flashlight. Yeah, you can see the bolts there. That’s pretty cool. The actual battery box — there are no coolant leaks anywhere. The only stuff you see is that Loctite all the way around.
Thanks for watching. My final assessment is the same as when we went into this: Ford went through a lot of engineering to make all the parts as easy to service and reuse as possible. With all the bus bars not being glued down and the clips just flipping open to unbolt the wires, all having plugs and clips wherever they can to be able to replace the parts that are going to wear out — and same thing with the hoses having clips and not being all molded into one piece — makes everything repairable to give the whole battery pack a long life. That also makes these modules very feasible for second life as well, once they’re too worn out to be in a car but are still good enough to power a house or something like that. So these you’ll definitely see ending up on the Greentec Energy website as well. So if you want to see other videos like this, don’t forget to like and subscribe and hit the bell. Thanks.
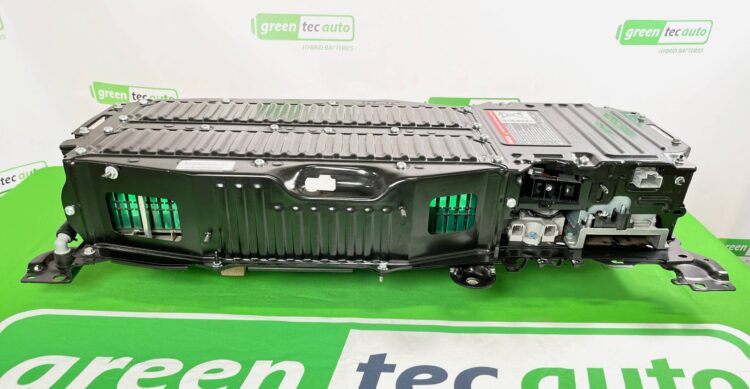
Hi, my name is Art with Greentec Auto, and today we’re going to be taking the lid off of a Mach-E battery.
So, this is a 98.8 kWh Ford Mustang Mach-E battery. Now this is the longer range version of the same battery style, and there are three different types of modules. All of them are four cells in parallel, but the amount of cells in series changes and the polarity on the corners changes. So there are two modules that are labeled type C in the part number, and those are 4P7S configurations — and there are only two of them. Then we have module A and module B. Those are 4P8S. And again, between the A and B, the only difference is the polarity is flipped or mirrored, so to say.
So this pack required a little bit of a more narrow front end, which a lot of different vehicles have also required, which will force them into that third module that’s a smaller module. But in turn you get a little more dense — you still use the space up front to where you’re actually maximizing as much as you can of it. These have been used a lot in aftermarket and second life applications just because the vehicles are still so new, and it’s because they are the configuration that they are. They take an 8S module and a 7S module and give you 15S, which is a high voltage 48V pack that’s great for golf carts and many applications like that. Most vehicles will be compatible with actually two of the 8S modules, giving you 16S. Sometimes the inverters can’t fully handle the full charge, and that’s when you run into a problem with that.
But rebuildability is one thing I wanted to talk about with this. It is quite unique — it is quite nice to be able to remove one section and replace it as faulted. You know, wherever there’s a problem in here, whether it’s bad cells or degraded cells in the particular module, you’re not sacrificing a large portion of the pack like you are with the Model 3. So this is actually quite nice to see, because with the Chevy Bolt, you did have much longer strings and it was harder to repair them. So they did change it up a little bit with this, and it actually makes it more convenient for companies like ourselves to be able to repair this in the future.
So I wanted to show you over here on the side. This is actually where the BMS makes the connections — the voltage and temperature taps. That’s the same on every single module, except on the sections up front it’s down the middle. But essentially these sections on top, because they had to scoot them in a little bit, are on the outside, which makes it easy for us to show you. But it just goes to show how easy it is to either one, remove and replace this, or two, take this with a module and harness and use that in conjunction with the BMS in any other application. Super simple to reuse.
Now the other thing I wanted to point out is the difference between this NMC pack and the standard range NMC pack. I mentioned earlier this is a 4P battery pack — four cells in parallel in every single module. The standard range has only three cells in parallel. That reduces the capacity. And what they’re able to do is actually make the entire pack flat. There is no hump on here — this top section is completely missing. They sacrifice that extra space and weight to get you the lower battery pack. Not everybody needs it, and that’s how they’re able to get a little bit more range from this version.
So we’re getting ready to take out those three modules. I will not be wearing high voltage gloves. I have been doing this for 13 years. You should be — it is dangerous. We’re going to start by disconnecting the BMS. That’s always the first step we always do. If we do disconnect one module and the BMS is still active, it can cause damage to the BMS. So if you’re ever doing any repairs, always, always, always BMS first, everything on the BMS, and then you can go ahead and start doing bus bars and other hardware.
These covers are actually quite neat. I’ll show you here — not only do they have a little locking on them, but when you open them, they stay open. And I guess maybe this one locks in. Most of the time those just come right back down and they’re in the way and you’re using two hands to get in where you’re going, but that makes it much easier.
On this bus bar, I can’t get to the other half without disassembling this whole section. So I’m going to just tape it up. It is still a live terminal. It’s probably not going to cause any harm, but it’s always better safe than sorry with this kind of stuff, especially if I’m stepping away from it. Tape’s not expensive, so make it safe for somebody else if they’re touching it.
Oh, this is my brother Paul — he’s been my helping hand today because these are not light. So here we have the three modules. And we have to stack them this way because on the bottom we have a thermal interface, and if we lay that down on anything that’s going to create a mess. And obviously getting the modules out wasn’t easy either — those things are definitely stuck down pretty well. We’re going to have to clean these modules completely, clean those cooling plates you saw earlier also completely, and apply new interface to get them back to spec.
One thing I wanted to point out was going to be on this edge here. We saw earlier in the video the module harness went directly into the battery. On these modules, look — there is a sub-harness. It actually makes it even easier to wire in a BMS, because then you take this section from the battery harness and that’s where you wire your BMS, and it actually makes it even easier to reuse.
So we have the three modules here now. And I didn’t see it earlier, but on one of the two — I used the word “mirrored” earlier, the technical term they used was “reversed.” You can kind of see it on here, but it doesn’t really matter. Big point is positive and negative terminals flip on the modules. Everything else is the same. The module up front is the 7S, and the terminals are diagonal of each other.
Now I’ve got the other terminal down. This little cup here, they made it nice and easy to stand up. But I just wanted to point out that this module is going to be a little bit wider than the others because the other terminal is sticking out on the other side.
Now I wanted you guys to take a look at the bus bars. They are actually pretty nice — they look great. Looks like there’s a laser weld on there. Very difficult to try and modify. I would not recommend trying to go in here and change the configuration. I know somebody out there has done it — I did talk to them about it once and they said it was probably the worst thing they could have done.
Next, I’m going to give you guys some details about the modules themselves — size and weight. For starters, these two modules are identical in size and weight. The A and the B are both 86.5 pounds. They are 21.25 inches in length, 14.5 inches in height, and all three modules are 5 inches tall. Now, these are a little bit on the higher side of the measurements — it’s maybe an eighth of an inch smaller. I’ve rounded up just because if I tell you the module’s bigger and it still fits, when you receive it you should be fine.
Last module, the C module. Again, the height is still 5 inches. The length is now 19 inches, and the width is 15 and a half inches. So it does gain an extra inch, and maybe depending on the space you’re putting it into, you can kind of twist it diagonally and make it work. Again, same thing with the harness — these three modules have that harness on the side. However, there will be two modules that have a different style harness. Depending on who and where you guys get these from, if they’re from us or if they’re from somebody else, that could change.
Other than that, that’s most of the information that we really wanted to provide on this. Cell replacement on this is probably not going to ever happen in terms of repair, but module replacement certainly will. If we had to repair something like this, we would cycle test the whole thing module by module to figure out exactly what the condition of the remaining pack is — not always just finding the bad ones, but cycle testing the rest to figure out what’s bad. And this makes it easy.
We had an F-150 video that we did a couple months ago, and one of the questions was about these coolant tubes. This one here is also broken, and we mentioned how it was repairable — and people asked how, rather, replaceable. You can see that one. There are quick connects to disconnect it, and you have four bolts — that whole plastic mold comes out. So that is something that is easily fixable. The lid is not glued down, it is a gasket. So you can take the lid off. You want to try to blow out as much coolant as you can before you get in there, or clamp off those lines, because you don’t want coolant leaking inside. But to answer your question, yes, definitely replaceable. Not like the Model 3 or Y where they say you have to replace the whole pack and you have to figure out how to fix it yourself. So much easier to fix.
So we have the battery back together. I will label these three as having the thermal adhesive compromised, which would need to be replaced if we try to put this back into a vehicle. Quick technique that we always use — like I mentioned, I’ve been doing it for a long time and didn’t get electrocuted. I don’t know if you noticed, but I always had one hand on the battery terminals when I was doing it. The other hand wasn’t touching the other side or anything like that. And lastly, we’re going to go ahead and plug in the BMS. And that’s it for today. We’re going to close this back up and put it on the shelf for whenever you guys are ready for it.
Thank you for watching.


![Green dollar sign inside a circular green border, representing money or pricing.]」,](https://greentecauto.com/wp-content/uploads/2026/06/Screenshot-2026-06-03-at-00.23.08.webp)


The cost of shipping to you is included with your purchase. This offer is good for the entire continental United States. Add $200 for shipping to a residential address. Let Greentec Auto make it simple to return your core to us, ask about our reduced return shipping rates.

A refundable “core deposit” of $500.00 will be added to your order at checkout. Once we receive your old battery, we will refund the core deposit back to you minus the cost of return shipping. Cores must be returned within 45 days of purchase. This applies to shipping orders only. In all other circumstances, the core will be picked up at the time of service, no deposit required.
Once your new hybrid battery has arrived, put the core battery back into the same packaging your battery arrived in. As soon as we receive your core battery, we will refund the core deposit back to you. It’s that easy.
At Greentec Auto, we’re dedicated to delivering the highest-quality EV & Hybrid battery replacements for Ford cars. We’ve built more than a decade’s worth of trust on dependability, value, and unmatched EV & Hybrid technology expertise. Every Ford EV & Hybrid battery replacement is thoroughly tested to exceed Ford dealership standards for performance and quality to ensure lasting performance and seamless compatibility with your vehicle.
We offer top-of-the-line EV & Hybrid battery packs at up to 50% off the cost at a Ford dealer, making EV & Hybrid repair more affordable. We cover our top-of-industry warranty for 12 to 48 months with unlimited mileage, giving every one of our customers peace of mind. We offer flexible financing options to make it easier than ever to get your Ford EV & Hybrid running like new without having to break the bank.
Convenience is the priority, so we provide mobile installation throughout the nation. Our Ford EV & Hybrid battery can be replaced at home, at the office, or wherever you prefer by certified professionals, so it’s never necessary to go to the shop. With 32 facilities across the nation, excellent service is never more than an hour away.
When you select Greentec Auto, you’re selecting to do business with individuals who understand Ford EV & Hybrid technology inside and out. Whether you own the Ford Fusion EV & Hybrid, C-Max EV & Hybrid, Escape EV & Hybrid, or the Focus EV, we have the ideal brand-new EV & Hybrid battery to bring back the efficiency to your car.
Being able to recognize the signs that the EV & Hybrid battery is failing can prevent unexpected breakdown and costly repair. Your Ford EV & Hybrid vehicle can be due for battery replacement if it exhibits any of the following signs.
Poor gas mileage is the most common sign of failed EV & Hybrid batteries. If the Ford EV & Hybrid you are driving is guzzling more than usual, it could be because the factory-installed EV & Hybrid battery is not assisting the engine to the same level. Dashboard lights such as the “Check EV & Hybrid System” or “Service High Voltage Battery” lights also indicate battery issues.
An aging Ford EV & Hybrid battery can also result in poor pickup and the noticeable lack of power when the car shifts gears to gas mode. Your Ford EV & Hybrid vehicle’s ongoing recharging or its failure to retain its charges is also another sign that the battery is losing its capacity. If the vehicle is older than 8-10 years, the battery’s life is coming to an end, and its replacement can prevent any more performance issues.
Ignoring such signs will subject the Ford EV & Hybrid system to added stress, which will result in costly repair work. Replacing the Ford EV & Hybrid battery at the first signs of trouble will restore it to function, save battery life, and see it operating like new for the future.

When the EV & Hybrid battery on your Ford is failing, you may wonder whether to replace the battery or sell the car. Your vehicle’s resale value is directly impacted by the condition of the EV & Hybrid battery. Private buyers and dealerships will offer lower prices when the battery is failing due to the cost to replace it.
Replacing the initial EV & Hybrid battery prior to sale can make your vehicle an even more desirable purchase to potential consumers. But if you’re going to be keeping the Ford EV & Hybrid, the new EV & Hybrid battery can double its life to 10 years, with you continuing to enjoy the dependable performance and added efficiency for many years to come.
At Greentec Auto, we offer affordable, performance-driven EV & Hybrid battery replacements that make it an intelligent purchase for the owner of your Ford EV & Hybrid. No matter if you choose to sell or keep the car, the new battery ensures the Ford EV & Hybrid vehicle will be reliable and efficient for many years to come.
When you choose to work with Greentec Auto, you’re choosing the business Ford dealerships and independent mechanics trust for EV & Hybrid battery replacements. We have an efficient process in place that ensures every customer the highest-quality service, performance-level batteries, and expert installation.
When you schedule your Ford EV & Hybrid battery replacement, our technicians carry out a thorough diagnostic test to confirm the condition of your factory EV & Hybrid battery. In the event that it needs to be replaced, we replace it with a high-capacity EV & Hybrid battery pack that meets or exceeds Ford factory standards. Convenient mobile installation is available at your schedule, and we include post-service testing with every installation to guarantee maximum performance.
Over 14 years of experience, 35 locations throughout the nation, and factory-authorized technicians mean you can trust Greentec Auto to replace your Ford EV & Hybrid battery. We care about quality, price, and customers and pledge to provide the highest quality and value for money.
Don’t let the faulty EV & Hybrid battery bring you to a standstill. Greentec Auto provides the industry’s finest Ford EV & Hybrid battery replacements with the industry’s finest warranties, expert installation, and prices that can’t be beaten. Contact us now and schedule your replacement to experience the Greentec Auto advantage. Whether you need to replace the Ford Fusion EV & Hybrid, Escape EV & Hybrid, C-Max EV & Hybrid, or the Focus EV battery, we have the product to make your EV & Hybrid car or truck run like new.
If you notice warning lights on your dashboard, don’t rush to the dealership for an expensive diagnostic report. Many local auto parts stores can scan your vehicle and provide error codes for free just ask them to run a quick scan with a diagnostic tool.
Above, we’ve listed some of the most common hybrid error codes. Keep in mind that the check engine light must be onfor major issues to be detected. If your vehicle is experiencing hybrid battery failure, dealerships often charge thousands of dollars for a replacement typically with a limited warranty.
At Greentec Auto, we offer a cost-effective alternative, providing high-quality hybrid battery replacements at a fraction of the price. Plus, we back our batteries with a comprehensive warranty to give you peace of mind.
The cost of a Ford hybrid battery replacement depends on the model and type of battery. Prices typically range from $1,500 to $4,000, but Greentec Auto offers savings of up to 50% compared to a Ford dealership.
A Ford hybrid battery typically lasts between 8-10 years or 100,000 to 150,000 miles, depending on driving habits, climate, and maintenance.
We offer warranty options ranging from 12 to 48 months, all with unlimited mileage coverage, ensuring long-term protection and peace of mind.
We use cookies and similar technologies to operate the website, understand how it is used, and support advertising. Optional analytics and marketing technologies will not be activated unless you give your consent. You can accept all, reject non-essential technologies, or manage your preferences. You can change your choices at any time.
Global Privacy Control has been detected. Advertising sale/share choices are disabled where configured.